
ListActivity的onListItemClick不响应的解决办法
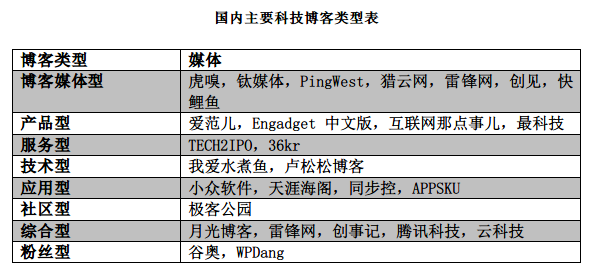
国内主要科技博客类型表
Android中listview使用baseAdapter的下拉刷新和加载更多功能
该功能基于多个成熟的博客和demo的集成,最适合开发的方式推荐。
首先是利用baseAdapter开发listview,baseAdapter拓展性自由性非常高,利用activity加载适配器Adapter再加载资源进入视图view中,图片imageview textview 等都可以自由的组织布局。在一个额外的xml布局中写好单个list项目的布局就可以自由的适配载入整个list 参考自定义BaseAdapter demo针对arrayAdapter simpleAdpter等四个适配器的比较。
其次是下拉刷新的功能,虽然网上有很多例子,但是不是继承FrameLayout 就是集成activity。很少有继承listactivity并且还使用baseAdapter的例子。这里主要参考的是Android中实现下拉刷新以及Android:ListView使用RelativeLayout与TableLayout比较 这里的关键并不是头尾的算法和头尾的布局,关键的是如何将listview嵌入另一个布局中并保持布局的稳定和及时性。由于使用的是baseAdapter数据不是直接在activity里添加而是通过继承自baseAdapter的适配器调用getView函数获得的,因而数据的呈现极其容易出现冲突。这里展示两种方法:
其一是针对上边Android中实现下拉刷新的例子中的函数改写的。原代码是:
<?xml version="1.0" encoding="utf-8"?>
<RelativeLayout
xmlns:android="http://schemas.android.com/apk/res/android"
android:layout_width="fill_parent"
android:layout_height="fill_parent"
>
<LinearLayout android:orientation="vertical"
android:layout_width="fill_parent"
android:layout_height="fill_parent"
android:background="#000000">
//将ListView改为包名.自定义的列表类名,MsgListView.java代码见后,此代码不需改通用,下拉刷新相关即此处,其他无关
<cn.xd.microblogging.tools.MsgListView
android:id="@android:id/list"
android:layout_height="wrap_content"
android:layout_width="fill_parent"
android:layout_weight="1.0"
android:drawSelectorOnTop="false"
android:scrollbars="vertical"
android:fadingEdgeLength="0dip"
android:divider="@drawable/line"
android:dividerHeight="3.0dip"
android:cacheColorHint="#00000000"
android:paddingBottom="40dp"/>
</LinearLayout>
<LinearLayout
android:id="@+id/msg_list_load"
android:layout_width="fill_parent"
android:layout_height="fill_parent" >
<LinearLayout android:id="@android:id/empty"
android:layout_width="fill_parent"
android:layout_height="fill_parent" >
<include
android:id="@android:id/empty"
layout="@layout/empty_loading"
android:layout_width="fill_parent"
android:layout_height="fill_parent" />
</LinearLayout>
</LinearLayout>
</RelativeLayout>
我的原baseAdapter的适配xml是:
<?xml version="1.0" encoding="utf-8"?>
<LinearLayout xmlns:android="http://schemas.android.com/apk/res/android"
android:layout_width="fill_parent"
android:layout_height="fill_parent"
android:orientation="horizontal" >
<LinearLayout
android:layout_width="wrap_content"
android:layout_height="wrap_content"
android:orientation="vertical" >
<ImageView
android:id="@+id/img"
android:layout_width="100dp"
android:layout_height="wrap_content"
android:layout_margin="5dp" />
<TextView
android:id="@+id/msgname"
android:layout_width="wrap_content"
android:layout_height="wrap_content"
android:layout_gravity="center"
android:layout_marginBottom="4dp"
android:textColor="#FFFFFFFF"
android:textSize="12sp" />
</LinearLayout>
<LinearLayout
android:layout_width="wrap_content"
android:layout_height="wrap_content"
android:orientation="vertical" >
<TextView
android:id="@+id/msgtext"
android:layout_width="wrap_content"
android:layout_height="100dp"
android:textColor="#FFFFFFFF"
android:textSize="22sp" />
    <LinearLayout
        android:layout_width="wrap_content"
        android:layout_height="wrap_content"
        android:orientation="horizontal"
        android:layout_gravity="left" >

        <TextView
            android:id="@+id/topic"
            android:layout_width="wrap_content"
            android:layout_height="wrap_content"
            android:layout_gravity="left"
            android:layout_marginRight="10dp"
            android:textColor="#FFFFFFFF"
            android:textSize="13sp" />
        <TextView
            android:id="@+id/msgtime"
            android:layout_width="wrap_content"
            android:layout_height="wrap_content"
            android:layout_marginRight="10dp"
            android:layout_gravity="left"
            android:textColor="#FFFFFFFF"
            android:textSize="13sp" />

        <TextView
            android:id="@+id/msgaddr"
            android:layout_width="wrap_content"
            android:layout_height="wrap_content"
            android:layout_gravity="left"
             android:layout_marginRight="10dp"
            android:textColor="#FFFFFFFF"
            android:textSize="13sp" />
        <TextView
            android:id="@+id/comment"
            android:layout_width="wrap_content"
            android:layout_height="wrap_content"
            android:layout_gravity="left"
            android:textColor="#FFFFFFFF"
            android:textSize="13sp" />
    </LinearLayout>
</LinearLayout>
</LinearLayout>
改写后的是:
<?xml version="1.0" encoding="utf-8"?>
<RelativeLayout
xmlns:android="http://schemas.android.com/apk/res/android"
android:layout_width="fill_parent"
android:layout_height="fill_parent"
>
<LinearLayout android:orientation="vertical"
android:layout_width="fill_parent"
android:layout_height="fill_parent"
android:background="#000000">
<com.wjy.message.MsgListView
android:id="@android:id/list"
android:layout_height="wrap_content"
android:layout_width="fill_parent"
android:layout_weight="1.0"
android:drawSelectorOnTop="false"
android:scrollbars="vertical"
android:fadingEdgeLength="0dip"
android:divider="@drawable/line"
android:dividerHeight="3.0dip"
android:cacheColorHint="#00000000"
android:paddingBottom="40dp"/>
</LinearLayout>
<LinearLayout
android:layout_width="fill_parent"
android:layout_height="fill_parent"
android:orientation="horizontal" >
<LinearLayout
android:layout_width="wrap_content"
android:layout_height="wrap_content"
android:orientation="vertical"
android:id="@+id/hehe">
<ImageView
android:id="@+id/img"
android:layout_width="100dp"
android:layout_height="wrap_content"
android:layout_margin="5dp" />
<TextView
android:id="@+id/msgname"
android:layout_width="wrap_content"
android:layout_height="wrap_content"
android:layout_gravity="center"
android:layout_marginBottom="4dp"
android:textColor="#FFFFFFFF"
android:textSize="12sp" />
</LinearLayout>
<LinearLayout
android:layout_width="wrap_content"
android:layout_height="wrap_content"
android:orientation="vertical" >
<TextView
android:id="@+id/msgtext"
android:layout_width="wrap_content"
android:layout_height="100dp"
android:textColor="#FFFFFFFF"
android:textSize="22sp" />
<LinearLayout
android:layout_width="wrap_content"
android:layout_height="wrap_content"
android:orientation="horizontal"
android:layout_gravity="left" >
<TextView
android:id="@+id/topic"
android:layout_width="wrap_content"
android:layout_height="wrap_content"
android:layout_gravity="left"
android:layout_marginRight="10dp"
android:textColor="#FFFFFFFF"
android:textSize="13sp" />
<TextView
android:id="@+id/msgtime"
android:layout_width="wrap_content"
android:layout_height="wrap_content"
android:layout_marginRight="10dp"
android:layout_gravity="left"
android:textColor="#FFFFFFFF"
android:textSize="13sp" />
<TextView
android:id="@+id/msgaddr"
android:layout_width="wrap_content"
android:layout_height="wrap_content"
android:layout_gravity="left"
android:layout_marginRight="10dp"
android:textColor="#FFFFFFFF"
android:textSize="13sp" />
<TextView
android:id="@+id/comment"
android:layout_width="wrap_content"
android:layout_height="wrap_content"
android:layout_gravity="left"
android:textColor="#FFFFFFFF"
android:textSize="13sp" />
</LinearLayout>
</LinearLayout>
</LinearLayout>
</RelativeLayout>
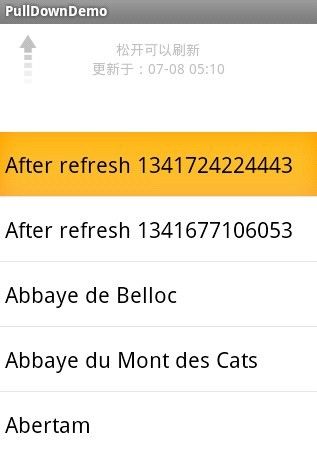
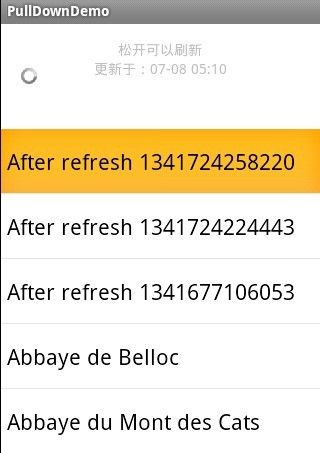
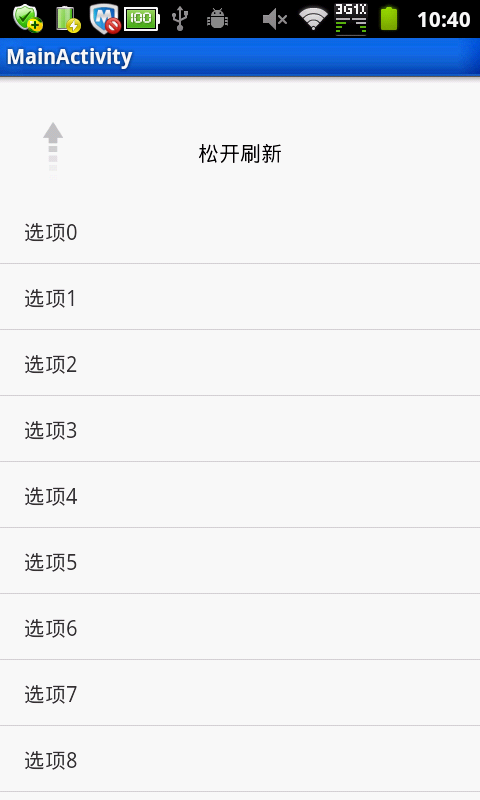
这其中加入了一个ImageView,一些textview的横横竖竖的布局。效果如图,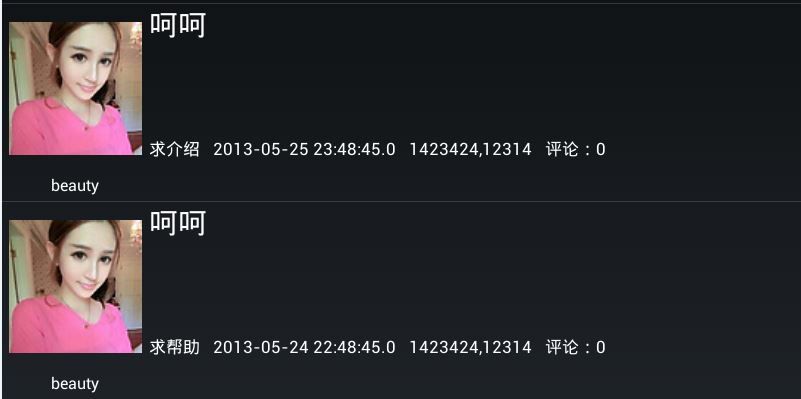
另一种是针对这个demo的PullToRefreshView这个托管在googlecode的资源非常完满的解决了很多问题,其中关于样式的xml有两个分别是:
grid_item.xml
<?xml version="1.0" encoding="utf-8"?>
<LinearLayout xmlns:android="http://schemas.android.com/apk/res/android"
android:layout_width="wrap_content"
android:layout_height="wrap_content"
android:orientation="vertical" >
<TextView
android:id="@+id/text"
android:drawableTop="@drawable/ic_launcher"
android:layout_width="wrap_content"
android:layout_height="wrap_content"
android:gravity="center_horizontal"
android:text="test"/>
</LinearLayout>
其中就是放入了一个固定的图片和固定的文字
可以随意替换。另一个是
test_listview.xml
<?xml version="1.0" encoding="utf-8"?>
<com.miloisbadboy.view.PullToRefreshView xmlns:android="http://schemas.android.com/apk/res/android"
android:id="@+id/main_pull_refresh_view"
android:background="@android:color/white"
android:layout_width="fill_parent"
android:layout_height="fill_parent"
android:orientation="vertical">
<!– 这里放置listview,gridview或者scrollview的布局 ,PullToRefreshView
要设置android:orientation="vertical"属性
否则,显示不正确–>
<ListView
android:id="@android:id/list"
android:cacheColorHint="#00000000"
android:layout_width="fill_parent"
android:layout_height="fill_parent" />
</com.miloisbadboy.view.PullToRefreshView>
这里和上边的一样都调用的私有的一个下拉刷新的头样式的view文件。这里都可以直接用。这个demo几乎不用改动xml,就是在Adapter适配器getView中
convertView = mInflater.inflate(R.layout.你的list样式名字, null);不同罢了。
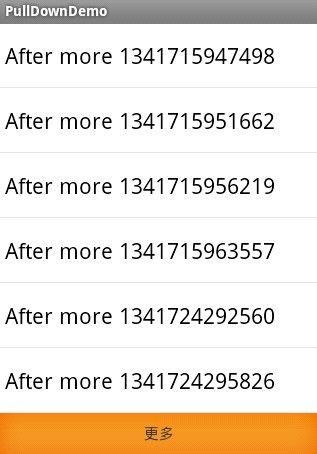
最后一个问题是下拉刷新中list数据改变的情况。这里不能在额外的thread进行数据的更改,这样会异常。另外在非主线程调用Adapter的notifyDataSetChanged方法也会抱错。这里可以参考notifyDataSetChanged() 动态更新ListView的例子,两种方法:1利用Handler处理2利用AsyncTask异步处理。这里图鉴第二种,这里加载图片,加载大数据方面AsyncTask非常管用。 可以参考这里Android中AsyncTask的用法实例以及这个例子:异步下载图片。
这是最后的效果: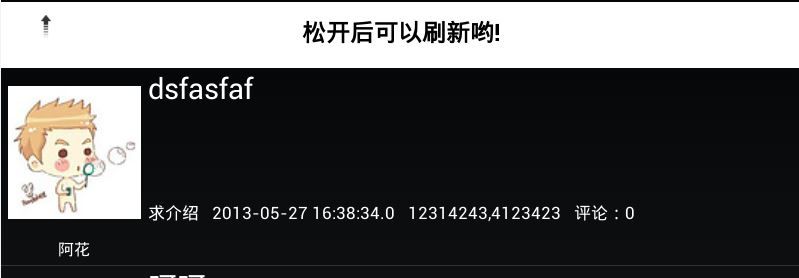
BaseAdapter使用好可以搭配出很多用户体验很好的列表,嵌入别的linerlayout也是很不错的。
android的ListView自定义样式 下拉刷新上拉加载 远程图片加载
国内普遍超遍天 各种标榜原创的复制粘贴文 贴几个真正用起来的
1.ListView的自定义样式 demo1很方便 四种ListView的实现方法都有 常用的还是自定义方便的simpleadpter
[caption id=”” align=”alignleft” width=”182”]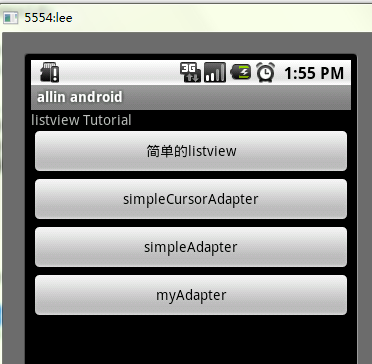 demo1[/caption]
[caption id=”” align=”alignleft” width=”178”] demo1[/caption]
2.ListView的下拉刷新上拉加载的demo2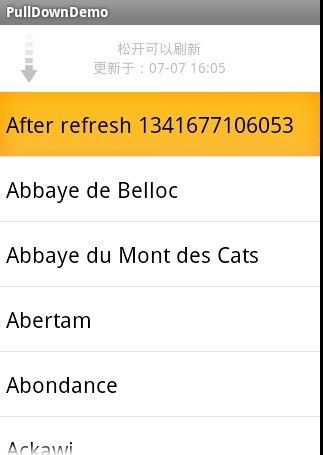
另一个demo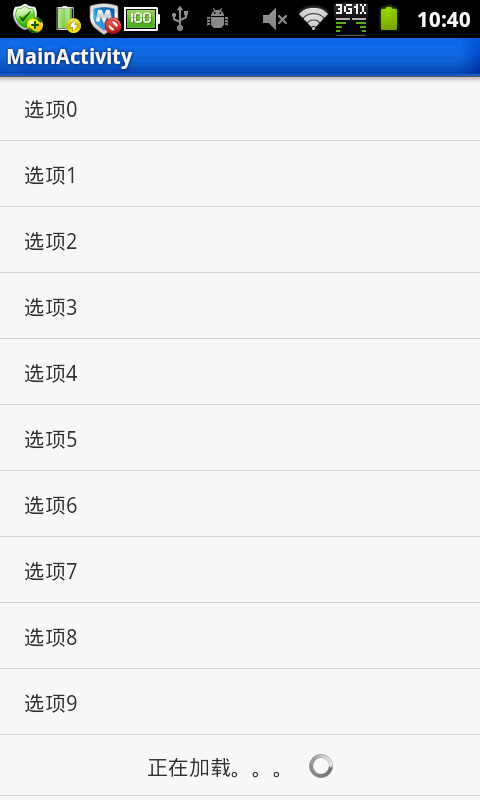
Conversion to Dalvik Format Failed With Error 1解决方法:
Android 中出现Conversion to Dalvik format failed with error 1这个错误但是却没有错误提示…90%的原因是包的冲突
检查一下是否有版本不同的jar包
第一种情况包导入错误.点击工程–>build path–>libraries–>选中android1.x 或者android2.x ,点击remove。
然后再点击add library–>User Library –>next–>User Libraries–>new 你取一个名字 比如android2.1 点击OK,
选中android2.1–>add jars–>\android-sdk-windows\platforms\android-7\android.jar 点击打开,点击ok–>finish.
第二种情况签名时没有成功。签名:java -jar signapk.jar platform.x509.pem platform.pk8 e:huaworkspace\hua\bin\hua.apk e:huaworkspace\hua\bin\hua_signaed.apk ,
如果hua_signaed.apk签名失败,那么请到你的工作目录中将hua_signaed.apk delete掉。
第三种情况包冲突,请到工程目录下将相同的包删除,重新导入一个,这一点和第一种情况类似,不过这是针对其他包,不是android包
最近的一些推荐拉
1.PDF转Word的格式完整转换工具 易捷PDF转换器
2.图床云服务 之前有过API的介绍 方便的简单图片存放的免费!服务器 imgur.com/
3.前端 桌面工具箱 各种截图 取色 像素测量 方便简单 picpick
Android使用HttpURLConnection HttpClient提交图片
Android进行图片提交大多数用的是HttpURLConnection 但是我的大半天的试验只成功了一次。参考了绝大多数主流的代码,不论是Base64还是Json还是URLEncode能换过的包都换过了,但都是上传成功,上传的效果要么图裂要么只有顶部的几条扫描进去了。
由于是服务器在国外甚至还考虑了翻墙的做法。但收效甚微,最终都是没达到上传到效果。
首先了解一下Android图片提交的普遍方案:
将图像转换成二进制的Bitmap数据然后进行Base64加密通过字符串进行传输。但是这里有个问题就是安卓的图片上传原则上是不能直接在机子的内存直接操作的,一般情况是先将图片一边写入缓存放入sd卡里,一边利用HttpURLConnection 进行上传。(但这个方法从始至终只成功过一次。。。然后我就崩溃决然了)
Android 丢Lib
android极其容易发生的NoClassDefFoundError错误
在csdn和stackflow都有人提问。。。最终的解决方案是:
1.建一个libs包(名字不楞换)libs右键->Build path->Use as source folder 并将所需的jar包丢进去 jar包也要加入buildpath
2.工程右键 java build path ->order and export 中勾选android private library 并置顶
Avd调试加速解决方案
Android常用控件及其使用方法
android初学成长记–
Android常用控件及其使用方法
利用Gson转换json数据和java对象
一直在使用json-lib包
每次得到数据都得转换半天 除了实体类外还要写一个影射类 非常的麻烦
利用Gson包就可以直接导入整个实体类以转换 不过需要的是json的数据名称与实体类的名称要一致
首先是实体类
public class User {
    private String userName;
    private String psw;
    public String getUserName() {
        return userName;
    }
    public void setUserName(String userName) {
        this.userName = userName;
    }
    public String getPsw() {
        return psw;
    }
    public void setPsw(String psw) {
        this.psw = psw;
    }
    public User(String userName, String psw) {
        super();
        this.userName = userName;
        this.psw = psw;
    }
    @Override
    public String toString() {
        return "userName= " + userName + " psw= " + psw;
    }

}
利用Gson输出Json数据
—-原版的利用影射类
public class MyServlet extends HttpServlet {

    private static final long serialVersionUID = 1L;
    public MyServlet() {
        super();
    }
    public void destroy() {
        super.destroy();
    }

    public void doGet(HttpServletRequest request, HttpServletResponse response)
            throws ServletException, IOException {
        this.doPost(request, response);
    }

    public void doPost(HttpServletRequest request, HttpServletResponse response)
            throws ServletException, IOException {
        response.setContentType("text/html;charset=UTF-8");
        PrintWriter out = response.getWriter();
        JSONArray array = new JSONArray();
         JdbcTemplate template=new JdbcTemplate();
         List<User>  list=null;
         try {
             list=(List<User>)template.findAll("select * from User", new UserMapping());
//数据库已连接好的情况下...User是表 UserMapping是实体类
        } catch (SQLException e) {
            // TODO Auto-generated catch block
            e.printStackTrace();
        }
             for (int i = 0; i < list.size(); i++)
                 {
                 JSONObject temp = new JSONObject()
                 .element( "Name",list.get(i).getUserName() )
                 .element( "password", list.get(i).getPsw() );
                 array.add(temp);    }
            out.print(array.toString());
            System.out.println(array.toString());
        }
        }
现在利用Gson就可以了
                Gson gson = new Gson();
        String msgJson = gson.toJson(list);
利用Gson转换json数据
转换单一字符串 如:
[{“userName”:”userName”,”pwd”:123}]
User user= gson.fromJson(str, User.class);
转换字符串组, 如:
List<User> users = gson.fromJson(str, new TypeToken<List<User>>(){}.getType());
for(int i = 0; i < users.size() ; i++)
{
     User user = users.get(i);
     System.out.println(user.toString());//这里想做什么都可以了 记住必须是实体类的名字和json中传送的名字相同
}
Win8笔记本热点创建
-netsh wlan show drivers
查看是否支持承载网络
-netsh wlan set hostednetwork mode=allow ssid=wlanname key=password
设置密码和名字
-netsh wlan start hostednetwork
启动热点
-netsh wlan stop hostednetwork
关闭热点
我不会告诉你这个会更加方便
http://jingyan.baidu.com/article/48b558e371b8e87f38c09a8e.html
Java和mySql间date数据的注意
已经吃了很多次亏了…每每其他调试得得意满满的时候就出来捣乱了
首先是在java中 date和string类型之间的转换就容易出错
直接使用toString默认输出的是
/* Date类的格式: Sat Apr 16 13:17:29 CST 2006 /
data->string
public static String DatetoString(Date dt){
        DateFormat df=new SimpleDateFormat("yyyy/MM/dd HH:mm:ss");
        String myD=df.format(dt);
        return myD;
    }
string->date
public static Date Trans(String str)
    {
        DateFormat df=new SimpleDateFormat("yyyy/MM/dd HH:mm:ss");
        Date d=null;
        try {
            d=df.parse(str);
        } catch (ParseException e) {
            e.printStackTrace();
        }
        if(d==null)
        {System.out.println("格式输入失败");}
        else
        {
            System.out.println("格式转换成功  "+d);
        }
        return d;
    }
其中,yyyyMMddHHmmss表示年月日时分秒不可以随便代替 其中可以加入: / - 空格等一切你想塞入的符号
这是月份的表示 其中月份是从0开始的
Calendar cal = Calendar.getInstance();
cal.setTime(new Date());
System.out.println("System   Date:   " + cal.get(Calendar.MONTH + 1));
以下是mysql和java之间传值转化的类
MySql的时间类型有 Java中与之对应的时间类型
date java.sql.Date
datetime java.sql.Timestamp
timestamp java.sql.Timestamp
time java.sql.Time
year java.sql.Date
/获得系统时间
java.util.Date date = new java.util.Date();
//将时间格式转换成符合Timestamp要求的格式
String nowTime = new SimpleDateFormat("yyyy-MM-dd HH:mm:ss").format(date);
java.sql.Timestamp ts_date = java.sql.Timestamp.valueOf(nowTime)
TimeDate->String
Timestamp ts = new Timestamp(System.currentTimeMillis());
        String tsStr = "";
        DateFormat sdf = new SimpleDateFormat("yyyy/MM/dd HH:mm:ss");
        try {
            //方法一
            tsStr = sdf.format(ts);
            System.out.println(tsStr);
            //方法二
            tsStr = ts.toString();
            System.out.println(tsStr);
        } catch (Exception e) {
            e.printStackTrace();
        }
TimeDate->Date
Timestamp ts = new Timestamp(System.currentTimeMillis());
        Date date = new Date();
        try {
            date = ts;
            System.out.println(date);
        } catch (Exception e) {
            e.printStackTrace();
        }